Astrophotography
tags: digital imagining Arduino prototyping image processing
My favorite thing about modern technology is that what was reserved for only a few couple of years ago is available to almost everyone tooday. Excellent example is astrophotography which used to be done by proffesional astronomers only and now there are thousands of amateur astrophotographers all over the world. Goal of this article is to present you basic knowledge about astrophotography which I’ve been doing for over 7 years now.
Although all images below are made by myself from the scratch I encourage you to visit my astrophotography galery here where I post more of my pictures. One of my favorites is Elephant's Trunk nebula:

Fig.1. Elephant’s Trunk nebula IC1396 (click for full image).
Elephant’s Trunk nebula and its surrounding, as they are picutred on image above, are formed by vast cloud of hydrogen which glows while heated up by neighbouring stars. It is located in our galaxy and it is a place where stars are being formed. The brightest star (orange one, on the right side) is called Garnet star and is one of the largest stars visible to the naked eye. It is running out of fuel – the same hydrogen which fills entire picture – and it is about to explode. Once it happens it would release a lot of heavy elements which are being used by all of us in cars, planes or jewelry.
Apparent size
If you have ever observed Wenus or Mars with your naked eye for sure you know these are just tiny bright dots on a night sky and it would require significant magnification to reveal its details. It turns out, as far as the basic amateur astronomy is concerned ,that it does not apply to deep sky objects which are outiside of solar system eg. star clusters, nebulas or galaxies. In order to picture the scale I’ve combined pictures of Andromeda galaxy and the Moon as they appear on the sky:

Fig.2. Comparison of Andromeda galaxy and Moon apparent size (click for full image).
It clearily shows Andromeda appears to be at least few times bigger than the full moon. Since all of my picutres shown in this article are in the same scale you can imagine how huge these objects are (eg. Fig. 1 nebula which doesn’t even fit the frame). As it turns out a lot of these objects are in reach of magnifications obtained by only slightly longer lenses than the stock ones we use with typical digital cameras. So if the size is not a key player, what is? Why cant we see these objects ourselves?
Imagining dim objects
There are just a few deep sky objects which we can see with our naked eyes eg. Andromeda galaxy, Great Orion nebula or Magellanic Clouds. The reason we cannot spot most of them is their low brightness. Nowadays our digital cameras do everyting for us but back in a days of analog photography everyone had to consider scene brightness in order not to overexpose the image. If the scene was too bright one could close the iris in order to let less light ener the camera to reduce the exposure. On the other hand if the scene was too dim it was enough to increase the exposure time in order to collect more light on photographic film. This concept was used from the beggining of astrophotograpy by Dr. J. W. Draper in 1840 who made first picture of the moon using daguerreotype, later on using classic analog phorography and is still in use by proffesionals and amateurs but using digital cameras instead.
Contemporary digital cameras use sensors built by milions of capacitors. Each capacitor carges (CCD) or discarges (CMOS) when is hit be the light. Once exposure is over signal from each capacitor is collected to establish a brightness of corresponding image pixel. In order to take the picture of dim object like nebula or galaxy long exposure times are used. Such process is shown on the following animation:
Fig.3. Data collection.
Data aquisition
If you ever take wide field long exposure photo of the night sky you will see thin arcs instead of stars as shown on the following picture:
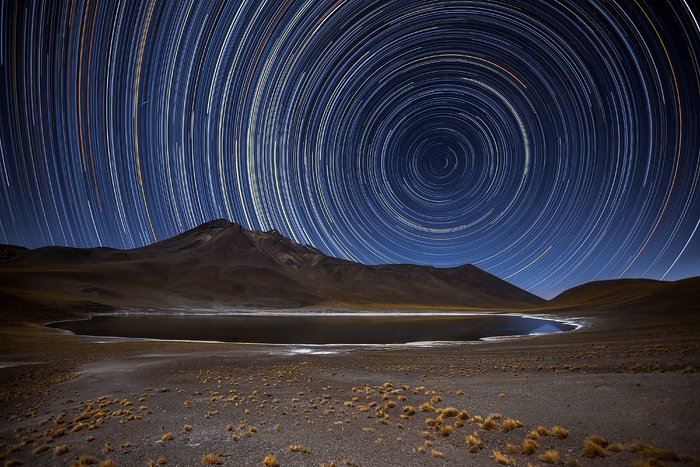
Fig.4. Startrails on long exposure image taken without sky tracking.
Such effect is due to apparent motion of the sky caused by earth rotation. Similarily to classic photography moving object would appear blurry and in order to get sharp image we need to compensate. In classic photography we can just use short exposure time but in astrophotography we need to compensate earth rotation. As shown above all star trails are concentric therefore in order to compensate specialized equipment is used. Telescope is fixed to a base by Equatorial Mount (see figure 6). Such mount has two perpendicular axes and one of which is being set parallel to earth’s axis (it is pointed to the origin of arcs shown above). Such setup forms Equatorial coordinate system which you can read more about in my other article here. The most important concept is that in order to compensate earth rotation only one axis must be motorized. This way we can track celestial objects such that constant position and orientation is maintained. Once tracking is used sharp image is obtained:
Fig. 5. Image without (left) and with (right) sky tracking (click for full image).
Hardware
In practice due to limited precision of equatorial mount and polar alignement tracking is done by continous position adjustements in both axes. Additional guiding telescope fixed to main one is used to track the sky (see figure 6). It is usually focused on one of the stars adjacent to primary imagining area. Guiding camera attached to it sends out the motion corrections to equatorial mount in order to minimize tracking error.

Fig. 6. My astroimagining setup.
There is a lot of hardware which supports the process. Heaters are wrapped around the lenses to prevent condensation. There is a stepper motor (arduino project) which controls main camera focus. Additional computer is used to control equipment. WiFi router allows to communicate with it. USB hub integrates all devices together. All these devices consume a lot of power hence separate power supply system is used. Some of them (heaters, focuser, power suppy or lightbox) are not easily available on the marked and were made by myself.
Image postprocessing
Picutres shown above were taken with total exposure time of 5-8hrs however it is never a single exposure. Unfortunatelly every gust or unexpected guiding error may impact tracking reducing the sharpness of image. In order to avoid it multiple long exposure frames are taken instead (typically 5-20min long). Once enough number of frames are collected it need to be postprocessed. Sample processing is shown following picture:

Fig. 7. Basic image processing workflow.
A lot of detailed processing is done using dedicated software. Whole process takes me about 2 weeks before I’m satisfied with the result because some of the subtle aspects of the picture like background level or tone of dim objects requires processing the picture in different ambient light conditions. Dedicated software tools are used to calibrate the color. These tools identify white stars on the picture and adjust picture color channels such that these stars appear white on the picture. During the processing it turns out there is a lot of noise which can be reduced by collecting more data.